 Using your dock for the first time
 NOTE:
NOTE:
-
Be sure to enable the "Internal Thunderbolt Controller" in the BIOS of your PC (BIOS Setting: Advanced - System Configuration - Internal Thunderbolt Controller - "Enabled").
-
If you would like to use PXE boot function, please select "Thunderbolt Dock" in the LAN Boot Selection in the BIOS of your PC.
For additional Thunderbolt BIOS Configuration, please check BIOS menu section "Advanced" and scroll down to "Thunderbolt Configuration". In this section you will find the "Devices under Thunderbolt" configuration as well as "Security Level" selection.
Connecting the AC adaptor
-
Connect the power cord to the AC adaptor.
-
Connect the DC output plug of the AC adaptor to the DC IN 20V jack on the dock. -
-
Plug the power cord into a live wall outlet. The power indicator on the front panel glows white.
Connecting to your computer
Plug one end of the Thunderbolt 3 USB Type-C cable into the Thunderbolt 3/USB Type-C port on the back of the dock and plug the other end into your computer which is powered on.
 IMPORTANT:
-
Only use the original Thunderbolt 3 cable, which comes with your dock!
-
USB Type-C cable is not compatible, as USB Type-C does not support all features. For details please see below comparison
Thunderbolt vs. USB Type-C comparison:

The power delivery indicator on the front panel glows white when the computer is being supplied power from the dock.

 NOTE:
NOTE:
-
HDMI and DisplayPort output on dock requires computer with DisplayPort over USB Type-C support. Please contact your computer manufacturer for more information.
Some computers might not immediately recognize that the dock is connected upon start-up. This is related to the computers BIOS start up sequence but not a malfunction of the dock. If this occurs, do the following:
1. Turn off the computer.
2. Disconnect the dock from the computer and wait approximately 30 seconds.
3. Turn the computer back on.
4. Connect the dock to the computer once the operating system of the computer has loaded.
Disconnecting/Undocking your computer
There are several ways to disconnect/undock your computer:
Note:
If a USB storage device is connected to the dock, make sure that you save the data located on the USB device, and then remove the USB device first before disconnecting/undocking.
Thunderbolt Software
The Thunderbolt Software enables you to manage the dock. If not pre-installed, please obtain the Thunderbolt Control Center app via the Microsoft Store.
-
After successfully connecting the dock to your computer, you will be prompted that "New Thunderbolt devices have been attached". Follow the on-screen instructions to enable Thunderbolt Software.
-
Launch the Thunderbolt Software by right-clicking the icon in the system tray to configure the settings as desired.
View Attached Devices
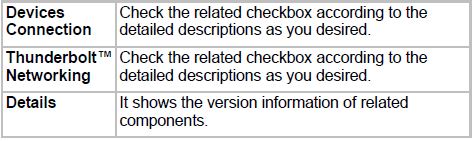
It allows you to view all Thunderbolt devices attached to the computer. Users can check the device information, connection status and power mode here. You can also open Approve Thunderbolt Devices by clicking the Connected or Not connected button.
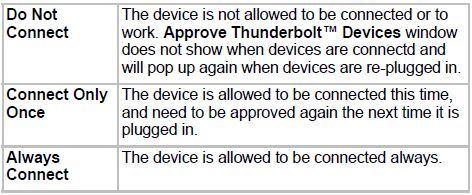
Approve Attached Devices
It allows you to select the device approve status. This item also pops up when new devices are plugged in.
Thunderbolt Networking
It allows you to select the device approve status (actions the same as Approve Attached Devices).
Note:
Thunderbolt Networking is only available while there is a peer-to-peer connection between the computers.
Manage Approved Devices
It shows the status/information of the approved devices. You can choose to remove the selected devices or all.
Settings
It allows you to configure the settings of this software.
Exit
You will exit the software by clicking this button
Configuring Audio Ports
You can play back or record audio either through the audio port of the dock or the docked computer. However, you cannot use the audio ports on the docked computer and on the dock at the same time. Upon connection, the audio port on the dock might become enabled and the audio ports on the computer disabled. When you undock the computer, the audio ports on the computer are re-enabled automatically. To change the default settings, you might need to adjust the audio settings in Windows manually, as described in this section.
Note:
-
If there is no audio device connected to the dock, the audio ports on the computer are enabled automatically.
-
Upon connection, to unplug and plug the Thunderbolt 3 USB Type-C cable again, you must close the running media playback application and wait approximately 15-20 seconds for the new settings to take effect before restarting the application.
-
Audio devices connected to the dock via the 3.5 mm audio jack appear as Toshiba Thunderbolt 3 Dock Audio in Windows
Configuring Video Ports
Connection
The dock provides the following video ports:
-
HDMI for connection to HDMI (using the HDMI cable which is not provided) interface monitors.
-
DisplayPort for connection to DisplayPort (using the DisplayPort cable which is not provided) interface monitors.
-
VGA monitor port for connection to VGA (using the VGA cable which is not provided) interface monitors.
-
Mini DisplayPort for connection to Mini DisplayPort (using the Mini DisplayPort cable which is not provided) interface monitors.
Note:
Upon connection, the video output ports on the dock become enabled and the video output ports on the computer become disabled. When you disconnect the dock from the computer, the video output ports on the computer are re-enabled automatically.
Connect the monitor cable (not provided) to the video output port on the dock and the external monitor. This cable can be connected and disconnected any time without disconnecting the dock from your computer. You can customize the video settings of the dock. See Adjusting Video Settings section for more information (contained in user's manual).
How Standby/Sleep/Hibernation Mode Affects Devices Attached to the dock
-
External Monitors
The external monitor connected to the dock goes blank if the computer enters standby/sleep/hibernation mode.
When in Duplicate mode, the external monitor retains the settings it had previoulsly when the computer resumes from standby/sleep/hibernation mode.
When in Extend Mode, windows that were previously on the external monitor might appear on the built-in display of the computer when the computer resumes from standby/sleep/hibernation mode. You might need to reposition the windows by dragging them to the external desktop again.
Also, if the external monitor is in Extend mode and the computer requires you to log in after resuming from standby/sleep/hibernation mode, the login screen appears on the primary computer display, not the external monitor. This is consistent with Windows Operating System standards.
-
Other Devices
If another device is connected to a port on the dock and the computer goes into standby/sleep/hibernation mode, that device does not function.
Troubleshooting
| Problem |
Troubleshooting Procedure |
|
AC adaptor does not power the dock. |
- Check the connections to make sure that the power cord/adaptor is firmly connected to the dock and a working power outlet.
- Check the condition of the cord and terminals. If the cord is frayed or damaged, it should be replaced, while if the terminals are soiled, they should be cleaned with a clean cotton cloth.
- If the AC adaptor still does not power the dock, you should contact dynabook Support.
|
|
No video on the monitors attached
to the video output ports on
the dock.
|
- Make sure the computer is connected with the dock. Check the Using your dock for the first time section in the user's manual to re-connect the dock to the computer.
- Make sure that the video cable is tightly secured to the video port in the dock and that the display output setting of the monitor is set to the correct mode.
This might be due to that the monitor(s) support higher resolutions than what the dock is able to support. Check the Configuring Video Ports section in the user's manual for details.
- If only one monitor is shown, while the other is not, go to the Intel Graphics Control Panel to select the output for the second monitor. Only a maximum of three external monitors are supported.
|
|
The USB ports are not
functioning on the dock. |
- Check the Using your dock for the first time section in this manual to re-connect the dock to the computer.
- Remove the USB device from the dock and then reconnect it to a free port in order to ensure that it is firmly attached.
- Ensure that any required USB device drivers are properly installed. To achieve this, refer to both the device documentation and the operating system documentation.
|
|
The LAN port is not functioning. |
- Check the Using your dock for the first time section in the user's manual to re-connect the dock to the computer.
- Check for a firm cable connection between the LAN jack and the LAN hub.
|
Dynabook provides this information "as is" without warranty of any kind, either express or implied, including, but not limited to, the implied warranties of merchantability or fitness for a particular purpose. Dynabook shall not be responsible for the topicality, correctness, completeness or quality of the information or software provided. Dynabook is not liable for any damage caused by the use of any information or software provided, including information that is incomplete or incorrect. Any trademarks used herein belong to their respective owners.

 Features
 Computer Requirements